OpenVPN is one of the most popular VPN (Virtual Private Network) implementations, and in our opinion, it’s the most secure. It’s also completely free to use! You can use a VPN to connect to a remote network and make it seem as if you are physically there, or you can subscribe to a VPN provider to make your Internet traffic anonymous.
Either way, you’ll need to install some software and do some configuration to get connected, so let’s dive in.
To make an OpenVPN connection, you will need to obtain an OpenVPN configuration file (some people may call this a “certificate”), either by receiving one from your network administrator or downloading it from your VPN provider. This file will have the file extension .ovpn.
Save the configuration file in a safe place on the computer you’ll be connecting from. While a username and password are still needed to connect to the VPN, even with the file, it’s important to be careful that this file doesn’t fall into the wrong hands.
You need to visit the OpenVPN downloads page and download the latest Windows installer. You will most likely want to download the Windows 10 installer.
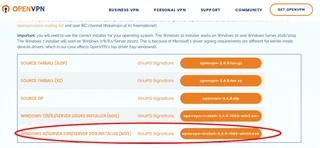
Visit the OpenVPN downloads page and download the latest installer.
Once the file downloads, you should see it at the bottom or top-right of your screen, depending upon which browser you’re using. Click on the file to run the installer. You’ll need to answer “yes” if you are prompted to allow changes to your computer.
The installer is easy to use. Simply click Next when it first opens, then click I Agree to accept the license. You will then be asked to select which components to install. Leave the default boxes checked (OpenVPN Userspace, OpenVPN Service, TAP Virtual Ethernet Driver, and the OpenVPN GUI), then click Next again.
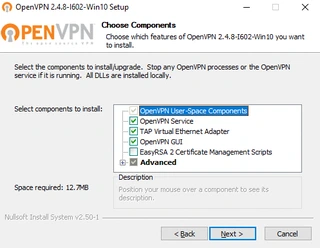
Leave the default components selected.
On the next screen, leave the installation folder at the default, and click Install. The installation should only take a minute. Click Finish when it’s complete.
You now need to open the OpenVPN software by clicking the Start Menu at the bottom left of the screen. Begin typing “OpenVPN” and you should see the OpenVPN GUI program appear in the list. Click the entry to open the program.
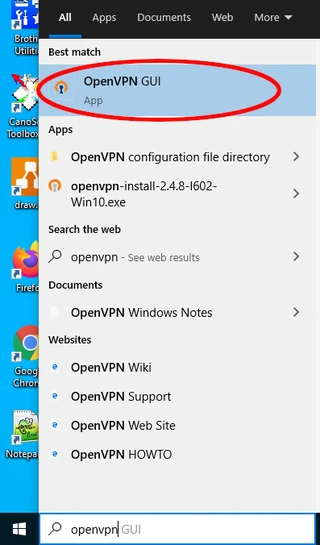
Begin typing “OpenVPN” in the Start Menu, and you will see the OpenVPN GUI program appear.
When you first open the program, you will receive an error message: No readable connection profiles found. That’s because we haven’t added our configuration file yet. Just click OK for now.
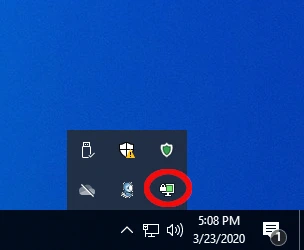
To open the program, we need to find the OpenVPN icon in the system tray. The system tray is the set of icons that appears at the bottom right in Windows, right beside the clock. Find the icon that looks like a small computer screen with a padlock on it. You might need to click the small up arrow by the clock to reveal the icon. Right-click the icon, then click Import File.
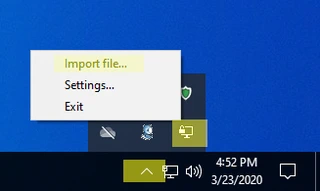
Find the OpenVPN icon in the system tray, right-click it, and select Import File.
Now you need to browse through the computer’s file system and find your .ovpn file. It may be in your Downloads folder, or another location that you chose. Find the file and double-click it to add it to OpenVPN.
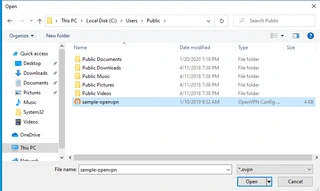
Find your OpenVPN configuration file and double-click to import it.
You should receive the message File imported successfully. Click OK.
Find the OpenVPN icon in the system tray again, and again right-click it. This time, you’ll have some additional options. We want to click on Connect.

Right-click the OpenVPN icon and click Connect.
You will be presented with a window where you can enter your OpenVPN username and password. Again, your network administrator or VPN provider can supply you with this information. If you’d like, you can check the box to save your password to avoid having to type it each time.
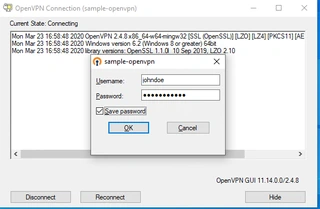
You will see a lot of technical information in the background window. If all goes well, you should receive a notification in a few seconds that you are connected. If the connection fails, you may see red text with the phrase auth failed, which means your username and password were incorrect. In this case, try typing them in again.
Once you are connected, you will notice that the OpenVPN icon has turned green. Success!
The icon turns green when you are connected.
The next time you want to connect, simply find the OpenVPN icon again, right-click it, and click Connect.
To disconnect, simply right-click the OpenVPN icon and click Disconnect. Done!
Before we finish, you’ll want to adjust one setting, which will make the OpenVPN program auto-start with your computer. If you don’t do this, you will need to search the Start Menu for the OpenVPN GUI after you reboot before the icon will appear in the system tray.
To set OpenVPN to auto-start, right-click the OpenVPN icon and click Settings. Make sure the box to Launch on Windows Startup is checked, then click OK.

Go to OpenVPN’s Settings and check the box to launch the program on Windows startup.
First, I’d recommend considering if you really want to be connected to the VPN all the time. Staying connected when it’s not needed can use bandwidth unnecessarily. Furthermore, if you are using a VPN service to browse anonymously, some websites, such as Netflix, will not allow you to connect from the VPN.
Our recommendation is to connect only when you need to. However, if you still want to auto-connect, you can simply leave the OpenVPN program connected and never disconnect. The connection will persist, even across reboots.
This concludes our post on connecting with OpenVPN from a Windows computer. OpenVPN is a great technology, not only because it’s the most secure VPN protocol and easy to use, but also because it’s completely free!
If you are interested in setting up remote VPN access for your business, or would like to stay anonymous on the Internet by using a VPN provider, Green Mountain IT Solutions can help. Call us today at 802-489-6948, or email info@greenmtnitsolutions.com. Thanks for reading!